How to Host Multiple Go Lang Web Apps on a VPS
With help from the OpenBSD OS and the Caddy Server
Overview
In this technical note, we’ll walk through creating a virtual private server (VPS) and setting up the OpenBSD operating system with the Caddy server to deploy multiple web applications.
By the end, we will have a robust and secure environment to host web apps like FooBar and others. Let’s begin by exploring how everything fits together.
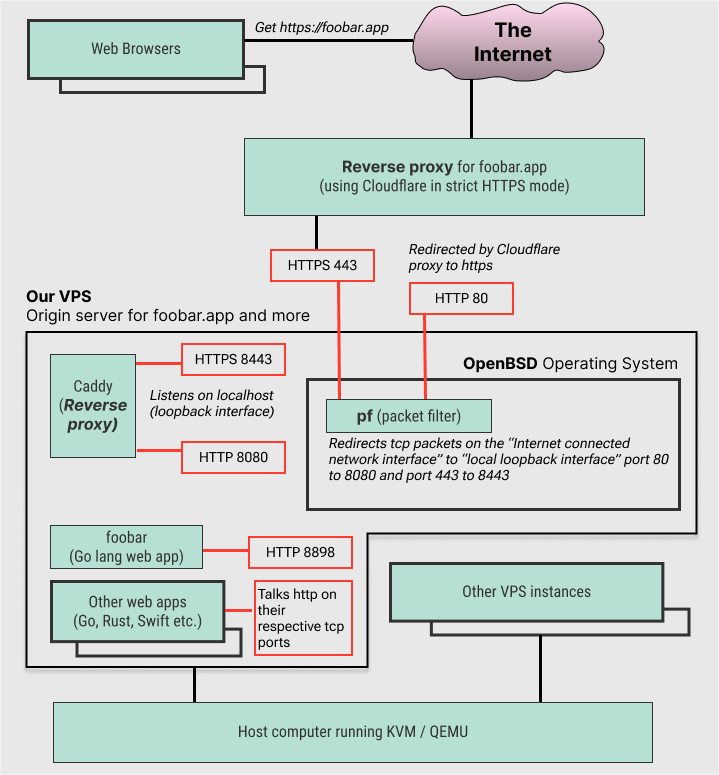
Multiple Go lang web apps hosted on a VPS with OpenBSD, PF and Caddy
The steps for hosting one app can easily be repeated to support additional apps.
FooBar1 is a Go web application, but the method described works for any app that communicates via HTTP on a TCP port, regardless of the programming language.
Let’s start with a typical request flow when a browser accesses https://foobar.app:
- The domain
foobar.appresolves to an IP address managed by Cloudflare. - Cloudflare serves as a reverse proxy for foobar.app.
- It redirects HTTP traffic to HTTPS and forwards HTTPS traffic to our VPS.
- Our VPS is the origin server for
foobar.app.
We use Cloudflare’s Strict HTTPS mode, ensuring all connections—between the browser, Cloudflare, and our VPS—are encrypted.
On the VPS, we install OpenBSD, which includes a built-in firewall called pf.
Unlike Linux-based systems (e.g., Debian, Ubuntu, CentOS), OpenBSD is a complete, cohesive operating system with a focus on security and code quality. Since its inception in 1996, OpenBSD has had only two remote vulnerabilities in its default installation, the most recent over 22 years ago. For more fascinating details, check out why-OpenBSD.rocks.
Let’s look at the key steps after the operating system is installed.
-
Separate Disk Volume for Data
We configure a dedicated disk volume to store data for our web apps.
-
Configure the pf Firewall
Using pf, we forward TCP traffic on ports 80 and 443 from the public interface to ports 8080 and 8443 on the loopback interface. This isolates the web server, ensuring it listens only locally, reducing the attack surface and enhancing security.
-
Install and Set Up Caddy Server
OpenBSD now supports the excellent Caddy Server, written in Go. Caddy simplifies managing TLS certificates by automatically provisioning and renewing them. Even with dozens of web apps listening on different local ports, Caddy (listening on ports 8080 and 8443) is the only server exposed to the Internet, thanks to our pf rules. Acting as a reverse proxy, Caddy maps each domain name to its corresponding app’s local port via the Caddyfile.
-
Configure Services for Web Apps
We configure OpenBSD services for each app to enable starting, stopping, and automatic launching on server boot via the rcctl command.
-
Build and Deploy Web Apps
To deploy an app, we clone its Git repository, build the binary, copy it to the appropriate location, and start its service. For redeployments, we’ll use a simple ksh script to streamline the process.
By following these steps, you’ll have a secure, efficient setup for hosting multiple web apps on your OpenBSD VPS with Caddy.
Create a VPS
Go to your infrastructure provider’s dashboard and create a new server (a VPS).
Choosing an Infrastructure (Cloud) Provider I used Hetzner Cloud, and this log note is based on that experience. However, since creating a new server, attaching a disk volume, and accessing a shell are similar across cloud providers, you can follow this guide with any provider.
If you haven’t used Hetzner before, you can get €20/$20 in free credit on your first month by following my referral link to Hetzner Cloud.
Hetzner Cloud Dashboard > Project > Add Server
- Location:
Hillsboro, Oregon- Hetzner has limited data center locations compared to other providers. As of December 2024, they have locations in Falkenstein and Nuremberg (Germany), Helsinki (Finland), Hillsboro (USA West Coast), Ashburn (USA East Coast), and finally Singapore (which is markedly more expensive than other locations).
- Image:
Debian 12- Hetzner doesn’t have OpenBSD as an option in the “Add Server” screen, but once the server is created, mounting the latest stable OpenBSD image is allowed.
- VPS Type:
Dedicated vCPU- A
Shared vCPUoption is also available and is much cheaper. However, for consistent performance from a VPS, a Dedicated vCPU offers great value for money, falling just short of getting aDedicated Server.
- A
- VPS Model:
CCX13( 2 vCPU | 8GB RAM | 80GB SSD | 1TB Egress).- Egress is data going out of the server, and Ingress (data coming into the server) is totally free.
- As of December 2024, Hetzner provisions
AMD EPYCseries CPUs for this line of virtual private servers. - The CPU model on the VPS I received was:
AMD EPYC 7003 (Milan)built on theZen 3architecture.
- Attached Volume:
10GB10GBis the minimum volume size.
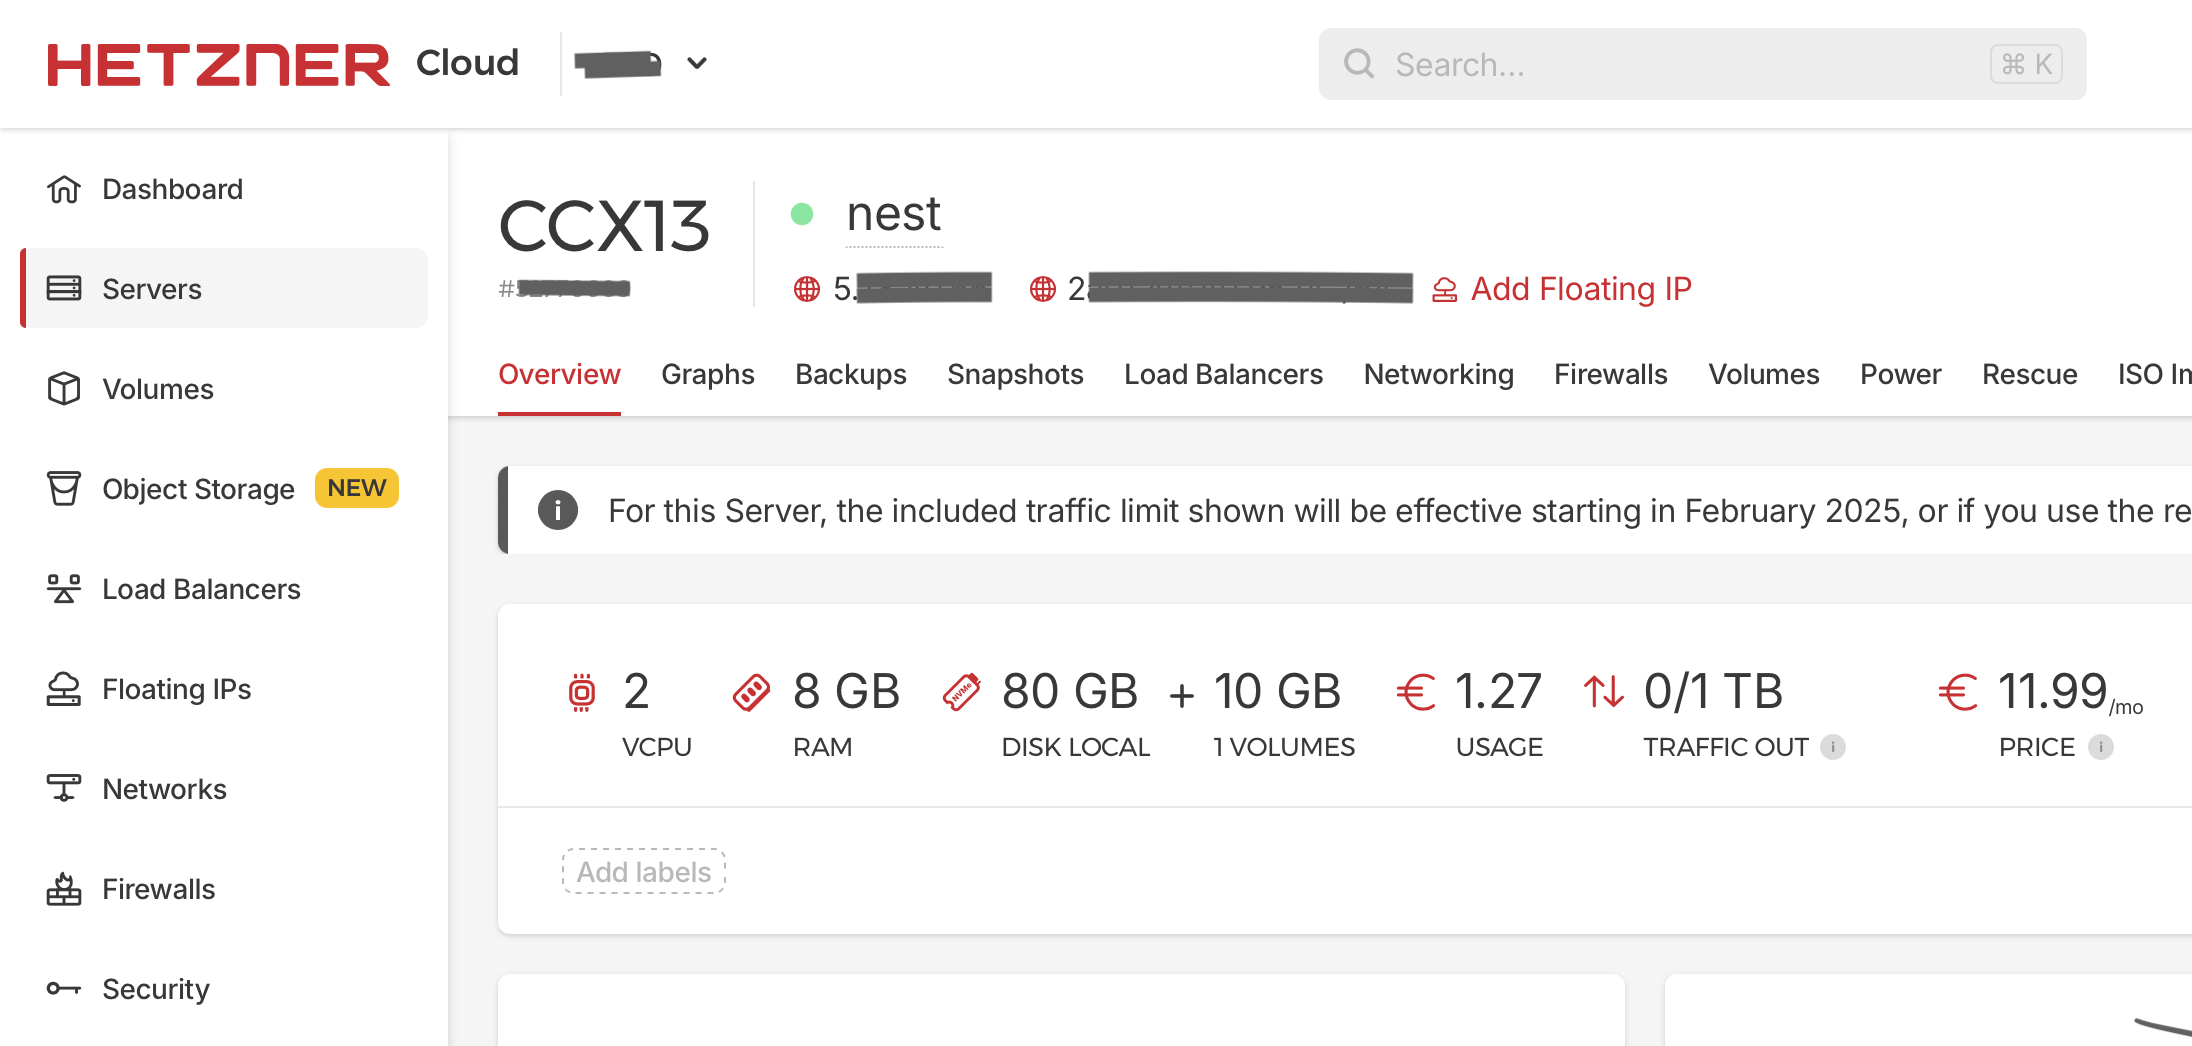
A CCX13-type virtual private server with dedicated vCPUs was deployed on Hetzner Cloud.
Install OpenBSD
Run Installer
Mount the OpenBSD ISO image and reboot the server.
- Server > ISO Images >
OpenBSD 7.6 (amd64) - Server > Console > Reboot (with the button that sends
Ctrl+Alt+Del)
After rebooting, the OpenBSD installer program starts running.
- What to do:
(I)nstall - Keyboard layout:
Default(or your preferred layout)
Set up Network
- System hostname:
foobar(your preferred name) - Network interface:
vio0 - IPV4:
autoconfig - IPV6:
autoconfig
The vio interface Hetzner implements its virtual servers using KVM as the backend hypervisor and QEMU as the frontend emulator. The OpenBSD VirtIO device driver supports the network interface exposed by KVM/QEMU to the VPS.
Root, User, Time
- Set
rootpassword - Start sshd(8) by default:
Yes - Start X Windows:
No - Change the default console to com0:
Yes - Set up a user:
nalaka(only if you have the same name as me) - Allow root ssh login:
No - Time zone:
US/Pacific(or wherever you are)
Disk, Reboot
- Which disk:
sd0 - Encrypt the root disk with a passphrase:
No - Use whole disk MBR, whole disk GPT, or edit:
GPT - Use auto layout, edit, custom:
auto - Install these sets from:
cd0 - Pathname to the sets:
7.6/amd64- leave all sets selected - Halt
Detach the ISO image. Power off, then power on the server.
Initial Setup
Say,
- The server’s IP address is
5.6.7.8 - The regular user’s name is
nalaka
Copy SSH Key
Use the ssh-copy-id command on the work computer to copy your SSH public key to the server.
|
|
Connect to the server via SSH.
|
|
Configure doas
The OpenBSD doas command is somewhat similar to the sudo command in Linux.
The word doas can be thought of as a concatenation of the first two words in the phrase “do as another user”.
SSH in to our VM as the regular user. We can’t SSH as root because we have disabled that when we installed OpenBSD.
|
|
After accessing the server, we can use the su command to switch from our regular
user identity (a user named nalaka) to the all-powerful root user. The word su can be thought of as a concatenation
of the first two words in the phrase “substitute user identity”.
|
|
Create the configuration file for the doas by copying from the example.
|
|
Open for editing
|
|
Add nopass option for the :wheel group in doas.conf, so that it looks like this:
|
|
Now we can use the doas command to “execute a command as another user” without entering that user’s password.
Exit the root shell with exit and check if doas works.
|
|
The -u options specifies the “user to do as” and it defaults to root. So the following two commands are equivalent.
|
|
Install essentials
|
|
Set up external disk
Using an external disk to store our web app’s data allows us to manage the operating system and our data separately.
Partition Table
List the disk names known to the OpenBSD Kernel using sysctl.
|
|
The 10GB SSD showed up as sd1.
Write a new GPT partition table to the disk using fdisk.
|
|
This commands initializes a new GPT partition table on the disk sd1 and opens the fdisk interactive editor.
- Use the
printcommand to see the partition table that will be created. - Use
quitto save changes and exit.
Partition
Open the disklabel editor on sd1.
|
|
Create a partition using the a command.
|
|
The label for the new partition is a and it takes all available space.
For file system type we choose the default 4.2BSD FFS2.
Use p g to print the partition table.
pis for printgis to print in GB
|
|
Quit and save changes using the q command.
Check the created disklabel and print the sizes in GB.
|
|
File System
Create a new file system on the a partition on disk sd1 using newfs.
|
|
Mount
Mount this file system using the mount command.
|
|
Explanation:
-vis for verbose mode./dev/sd1ais the “special device” representing theapartition on disksd1./var/datais the node in the file system tree where that special device will be mounted.
To check all is well, create a file in this new file system.
|
|
Update fstab
Check the DUID (Disk Label Unique Identifier) of this partition
|
|
We get something like this:
|
|
So the DUID for disk sd1 is 123a08f7773f618b.
Now, add a new line to /etc/fstab
|
|
This line describes where and how our disk should be mounted on the file system tree.
123a08f7773f618b.a. The “block special device” to mount, in this case, the a partition on the disk identified by
the DUID (Disk Label Unique ID) 123a08f7773f618b (corresponding to the device sd1).
/var/data. The mount point in the file system tree where the partition will be accessible.
ffs. The type of file system to use. ffs refers to the 4.2BSD Fast File System 2,
which is the default file system for OpenBSD.
rw,nodev,nosuid are the mount options.
rw. Enables read-write access.nodev. Prevents the interpretation of special device files, meaning it is not possible to use mknod to create device files or access devices from this file system.nosuid. Disables the ability to set the set-user-identifier (setuid) or set-group-identifier (setgid) bits, preventing privilege escalation through executables on this file system.
1 2 File system backup and check options.
1. The file system backup frequency (in days) for use by the dump command.2. The pass number for the fsck command. This determines the order in which file systems are checked. The root file system is checked first (pass 1), and this disk will be checked during the second pass.
Reboot
|
|
Check if our disk had been properly mounted by checking the file that we created earlier.
|
|
Setup Firewall
OpenBSD includes a built-in firewall called PF, which is enabled by default.
By default, it “drops packets” arriving at the HTTP (80) and HTTPS (443) ports of the
Internet facing network interface, vio0.
In the next step, we will configure Caddy to serve multiple web applications. Caddy will listen on ports 8080 (HTTP) and 8443 (HTTPS) on the loopback network interface.
To make this work, we need to redirect TCP packets arriving at ports 80 and 443 on vio0
to ports 8080 and 8443, respectively, on the loopback interface.
Add to the end of /etc/pf.conf, add the following lines.
|
|
Reload pf config with doas pfctl -f /etc/pf.conf
Add DNS Records
Go to the domain registrar’s dashboard and add DNS records for each domain you want to serve.
For example, in Cloudflare: Console > foobar.app
- DNS > Records > Add
- Type:
A - Name:
* - IPv4 Address:
5.6.7.8 - Proxy Status:
Enabled (orange)
- Type:
- SSL/TLS > Overview
Full (Strict)
Proxy for our origin server With Proxy Status:
Enabled (orange)Cloudflare will act as a reverse proxy for our5.6.7.8server. So, when the domainfoobar.appis resolved, instead of revealing5.6.7.8, Cloudflare will show one of its IP addresses.With
Full (Strict)SSL/TLS encryption mode, both “Browser - Cloudflare” and “Cloudflare - Origin Server” connections are encrypted.
To serve the www subdomain as well, we can add another DNS record.
- Type:
A - Name:
www - IPv4 Address:
5.6.7.8 - Proxy Status:
Enabled (orange)
Setup Caddy
Install Caddy on OpenBSD.
|
|
Edit /etc/caddy/Caddyfile and add the following at the end.
|
|
We are setting up Caddy to:
- Reverse proxy requests to
foobar.appto port8898. Later on, we will set up our Go web app to run and listen at this port. - Respond with the text “Foo Bar” and a
200status code for requests towww.foobar.app.
Change the ports Caddy listen to by editing the http_port and https_port in the Caddyfile.
|
|
Caddyfile We had already set a
pf(OpenBSD packet filter) rule to forward incoming HTTP (80) and HTTPS (443) packets to ports 8080 and 8443 respectively.
Here is the full Caddyfile for reference.
|
|
Enable and start caddy daemon.
|
|
Now when we visit https://www.foobar.app we should get the text “Foo Bar” and a 200 status code.
If http://www.foobar.app is visited, the request should be redirected to https://www.foobar.app automatically.
After the next sections, when we run our Go web app at port 8898 we will be able to see it at https://foobar.app.
Set up the Service
The next step is to configure an OpenBSD service for our web app. This allows us to start and stop the web app using the rcctl command and ensures the web app automatically starts on server boot.
First, we will create a dedicated system user _foobar to run the Go app.
|
|
The user ID 898 is chosen arbitrarily and such that it is not already used in the system.
Check the newly created user and group.
|
|
Create the data directory for our web app.
|
|
This is inside the external disk that we had set up earlier.
Give ownership of the new directory to _foobar user and group.
|
|
Create the script to control our new service at /etc/rc.d/foobar.
|
|
Later on, we will build our Go web app and place the binary at /usr/local/bin/foobar.
We are passing the flag --port=8898 to the Go app so it knows which port to start the server on.
Make thefoobar service control script executable.
|
|
Edit /etc/rc.conf.local and add foobar to the pkg_scripts list.
Also set foobar_flags to empty string.
|
|
Now the foobar service is set up and enabled.
Set up the Build
Install Go
We can install the Go lang toolchain by downloading the correct gzipped tarball from the official Go website.
For example:
|
|
Later on, to upgrade to a new version of Go lang, repeat the same steps with the new gzipped tarball.
|
|
To make the update to $PATH permanent, in the ~/.profile file, append /usr/local/go/bin to PATH.
|
|
Clone the source repo
On the VPS, use ssh-keygen to generate an SSH key pair.
|
|
Print the public key to the console so it can be copied.
|
|
Go to the Git repository hosting provider’s dashboard and add the copied SSH public key- e.g. in GitHub: Settings > Access > SSH and GPG keys > Add
Clone the source repository.
|
|
Example code
The ~/foobar/go.mod file.
|
|
The ~/foobar/assets/index.html file.
|
|
The ~/foobar/cmd/foobar/main.go file.
|
|
Build the Go web app
Build.
|
|
Move the generated binary to /usr/local/bin.
|
|
Before starting the service, try running manually, so we can see errors in the console.
|
|
- We are running our
/usr/local/bin/foobarweb app as the user_foobarbecause we useddoas -u _foobar. - We are passing in the
--portflag to our web app.
Shutdown with Ctrl+C.
Now, start the OpenBSD service with rcctl.
|
|
Enable the service to autostart on server reboot.
|
|
Now when we visit https://foobar.app we should see our Go web app.
Check that all is well
Restart server and check if everything is still working as expected.
|
|
Deploy a new version
We just need to pull the latest code from the remote Git repository, build, stop the foobar service,
replace the foobar binary, and start the foobar service.
Here’s a ~/foobar/deploy.ksh script that will carry out these steps with some error reporting.
|
|
Multiple web apps
Serving multiple web apps is as simple as adding a new domain to the Caddyfile and
setting up a new OpenBSD service to run that web app under.
These web apps do not need to be written in Go lang. For example, they could be written in languages like Rust, Zig, Swift, C++, or even in C. In fact, we could write the web app in any language as long as it listens on a TCP port and talks HTTP with connecting clients.
-
The app name FooBar and the domain foobar.app are used only as examples. ↩︎